What to test, what the numbers really mean, and a simple “go / no-go” checklist
Moisture is the quiet cause behind a lot of call-backs: LVT/vinyl lifting, bubbles, adhesive failures, patchy levelling compound, and timber movement. The problem is that a floor can look dry and still be too wet to install over.
This guide is written for installers (new or experienced): what to test, when to test, what results people commonly work to in the UK, and how to make a fast decision on site.
Why substrate moisture testing matters!
If there’s too much moisture in a slab, screed, or subfloor:
- adhesives may not cure properly
- smoothing/levelling compounds can fail (soft, dusty, debonding)
- resilient floors can lift or bubble
- timber can cup, expand, or gap
A quick moisture test protects your time, your reputation, and your margin.
The 3 moisture questions you should answer on every job
1) Is the floor actually dry enough for this floor covering and adhesive?
Many UK specs for resilient flooring are expressed as relative humidity (RH) thresholds. A widely referenced benchmark is ≤ 75% RH for resilient floor coverings, and ≤ 65% RH for timber flooring installations (check your product system requirements).
2) What is the risk profile of this job?
Higher risk = more likely you should test rather than guess:
- new builds / recently poured screeds
- ground floors (especially with unknown DPM history)
- basements / coastal areas
- anhydrite/calcium sulphate screeds
- buildings recently dried out / leak history
3) What test method does the manufacturer/spec require?
Some jobs specifically require a hygrometer/RH test under BS guidance. The UK concrete industry notes that BS 8203 insulated hygrometer testing is the preferred method for assessing floor moisture, and also cautions that resistance-type moisture meters are not recommended for assessing floor moisture on concrete. (That doesn’t mean moisture meters are useless; it means use them properly: as preliminary checks, not as your only “sign-off” on concrete).
Moisture test methods installers actually use (and what they’re good for)
A) Hygrometer / RH box test (the classic “go/no-go”)
A hygrometer setup measures the relative humidity of moisture leaving the floor, not just what’s on the surface. It’s commonly used for decision-making on resilient installs. The CFJ explains the principle and typical time-in-situ approach.
- Where it fits best: final sign-off checks for resilient floors and when the spec asks for RH.
- Typical benchmark referenced in UK guidance: ≤ 75% RH for resilient and ≤ 65% RH for timber.
Tools we stock that support RH checks:
- Wolff 71053 Hygrometer Universal V1-D4 (suitable for preliminary checks and moisture measurement on concrete and anhydrite subfloors).
- Wolff Substrate Test Kit which includes sturdy wooden case, thermo-hygrometer W-TH, screed moisture, indicator W-ES, screed and levelling compound tester, chisel with hand protector, hammer.
Note! Always follow the test duration and method required by the flooring/adhesive manufacturer and any job spec.
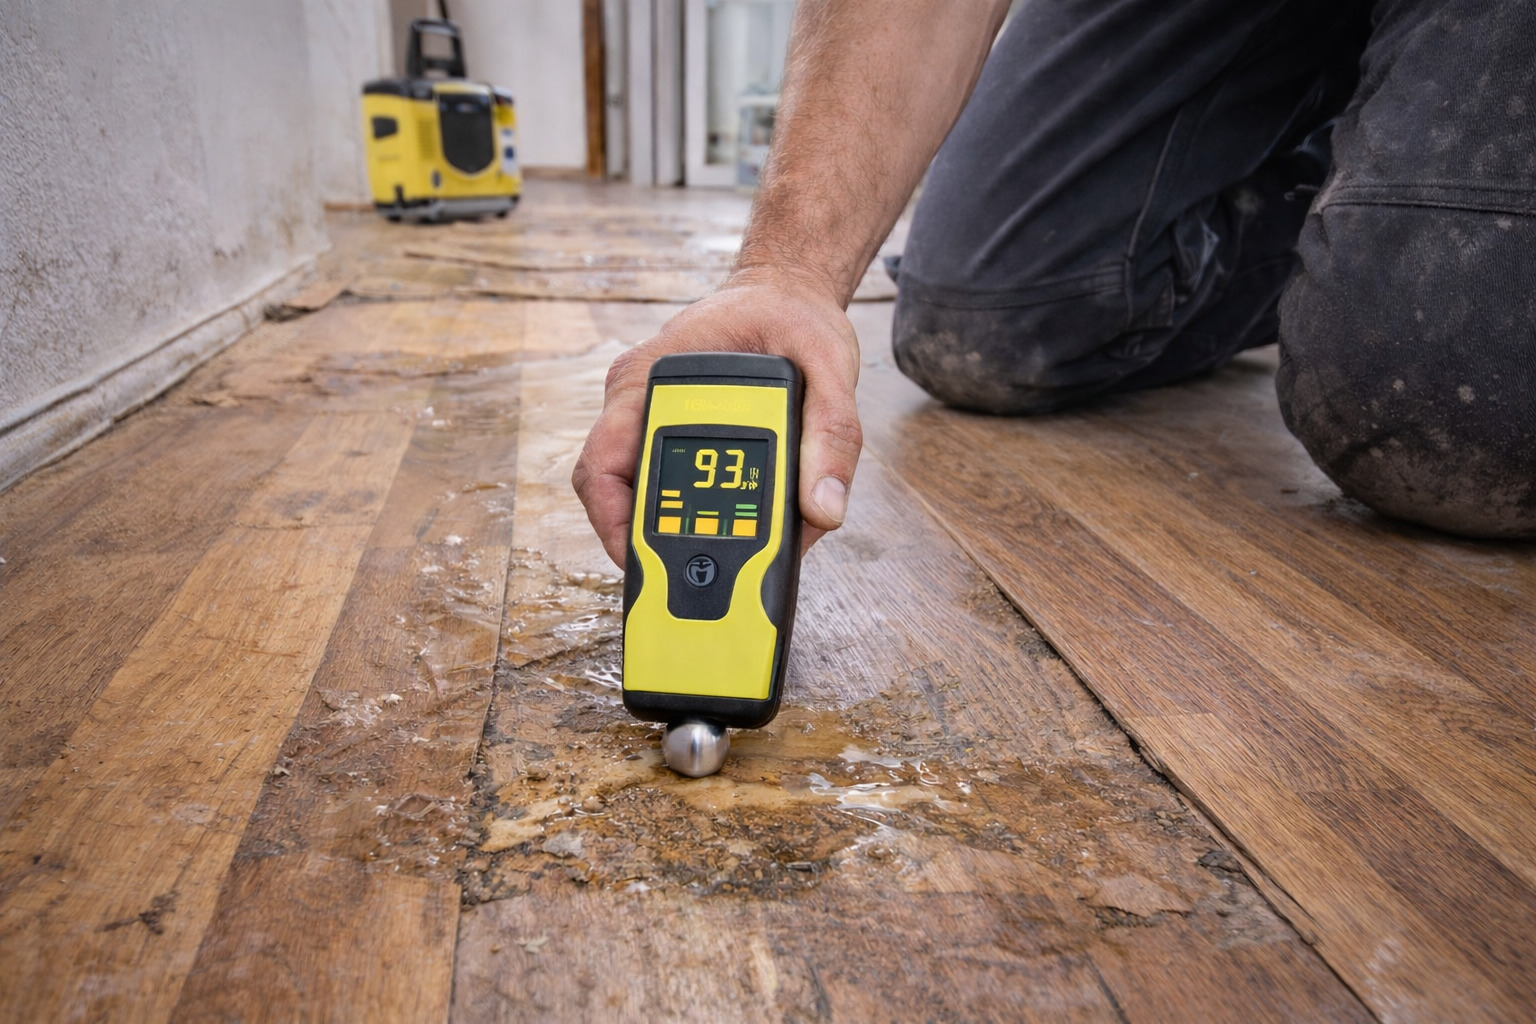
B) Non-invasive moisture meters (fast screening / “should I worry?”)
Non-invasive meters are brilliant for quick comparisons across a floor: spotting wetter zones, checking if a drying programme is working, and deciding whether a full RH/CM test is worth doing.
- Where they fit best: initial site survey, checking multiple areas quickly (edges, thresholds, patch repairs), and “is this drying evenly?” monitoring.
Important: Use meters as trend/relative tools unless your system explicitly accepts meter readings for acceptance. For concrete, the industry guidance strongly favours RH testing for final acceptance.
C) CM (“carbide bomb”) tests (often used on calcium sulphate/anhydrite)
CM testing is more invasive and is used in parts of Europe and also on certain screed types in the UK (particularly calcium sulphate / anhydrite), depending on manufacturer/system requirements.
The fast on-site workflow (what we recommend installers actually do)
- Step 1 — Do a quick risk scan (2 minutes): New build or recently levelled? Ground floor / unknown DPM? Anhydrite screed? Any visible damp marks, condensation, musty smell? If “yes” to any of these: test.
- Step 2 — Screen the floor (10–15 minutes): Use a non-invasive moisture meter to compare multiple zones like the centre of the room, perimeter walls, doorways/thresholds, and patch repairs / different substrates.
- Step 3 — Confirm with the required acceptance test: If the job spec/manufacturer requires RH/CM: do that method for sign-off. Hygrometer/RH is commonly referenced in UK practice for resilient installs.
- Step 4 — Decide: go / delay / protect: If the floor isn’t within spec, delay the install or follow a manufacturer-approved moisture management system (DPM/MVS etc.) per product datasheets (don’t wing it).
Download the Printable “go / no-go” checklist HERE
Things that you may get wrong when checking your substrate flooring…
- “It looks dry…” Moisture doesn’t need to look wet. New slabs can hold moisture for a long time, and surface dryness can be misleading.
- “My meter says it’s fine.” Meters are excellent for screening, but concrete industry guidance warns against relying on resistance-type meters for concrete moisture acceptance. Use RH/required method for sign-off when needed.
- “Only the middle matters.” Edges, thresholds and repaired patches often behave differently and that’s where failures show up first.
Recommended moisture check kit for flooring professionals
FAQs when checking the subfloor moisture
What RH should a concrete floor be before laying LVT/vinyl?
A commonly referenced UK benchmark is ≤ 75% RH for resilient floor coverings, but always follow the floor/adhesive manufacturer’s requirement for the specific system.
What RH is acceptable for timber flooring?
A commonly referenced benchmark is ≤ 65% RH for timber floor installations (again: check system requirements).
How long do hygrometer tests take?
Guidance commonly describes leaving a hygrometer box in place for multiple days to reach equilibrium (often stated as 3–7 days depending on method and guidance).
Can I just use a moisture meter?
Use it for screening and comparison, especially to find wet zones. For concrete acceptance, UK guidance points to hygrometer/RH testing as the preferred approach.
